Installing Heat and Sound Insulation By Jim Clark (The Hot Rod MD)
The exhaust on my roadster is routed close to the floorboards creating a potential heat problem. This is not that big a deal in an open car but a lot of heat against the underside is still undesirable. Padding under the carpet would cut down on this, but a better solution is the application of a thermal-insulating heat barrier like HushMat.
In the past I had a bad experience with exhaust heat against the floorboard of a 1970 Ford van that demonstrates the need for this type of installation. Tom McMullen and I were traveling from L.A. to Peoria, IL to cover the opening of a new AEE Choppers dealership and chopper gathering for "Street Chopper” magazine. We loaded two choppers in the back of a van along with our clothes and camera gear. The muffler on the van was located close to the floor on the right side next to the slider-door creating a hot spot on the bare metal floorboard. We placed our luggage, consisting of two brown paper grocery bags containing our change of clothes, right over the spot. At the time we were not aware of the fact that Tom's wife Rose had left frozen chicken necks in the bottom of the bag when she packed his clothes in them.
The frozen chicken necks were for feeding Tom's pet cougars and she had forgotten to remove them from the bag after returning from shopping. We placed them in the van right above the hot spot where they began slowly thawing out. At first we thought some kind of dead critter was stuck up against the exhaust or hot engine creating a foul odor. We checked underneath the van but found nothing. Finally, as we were driving through the night in the middle of Kansas, we couldn’t take the smell anymore and decided to pull over. We searched the van until we found the source of the awful stench. When Tom lifted the bag the wet bottom of the bag tore loose dropping the chicken necks on the ground. They had thawed and started decomposing over the hot spot. Once we removed them we were able to continue on our trip.
I don't anticipate any long high-speed runs like that in the roadster, but expect the Magna-Flows mounted close to the floorboard will give off a fair amount of heat. To combat this I installed the sound deadening and thermal insulation material HushMat Ultra on the firewall, floorboards and interior surfaces of the body. It's an adhesive-backed foil that sticks tenaciously to most any surface reducing thermal transfer by over 400 percent. One layer can reduce firewall heat by over 40 percent. It forms well around irregular surfaces and changes the hollow sound of sheetmetal to a solid "thunk". The sound attenuating features are not as noticeable in an open car but the harmonic drivetrain noises are not as readily transferred to the occupants.
On the firewall I applied Silencer Megabond over the HushMat Ultra, to absorb engine noise instead of Jute padding that was commonly used for this purpose. It has an adhesive backing that sticks to any surface and forms well around irregular shapes. It can also be used on the floor under carpet, on door panels and under headliners. My upholsterer will add padding beneath the carpet before he installs it. Before he does that I will secure the wires that run to the rear of the vehicle along the floor inside the body with Quiet Tape. It sticks to nearly any surface and will prevent the wires from moving around or being damaged beneath the carpet.
There are a number of similar products available that are either peel-and-stick or mixed and sprayed on but I chose HushMat because it is the one used most by the OEM carmakers and fares the best in the independent tests that I have seen. The accompanying photos show my own installation process. It was not difficult but required some careful planning and measuring before cutting the material. In most cases I made patterns using the backing material from the HushMat. Large flat areas where full sheets were used did not need this, but for small irregular areas this was necessary.
This installation may seem like overkill in a roadster but the benefits far outweigh the cost and small amount of time needed to complete the job. My 80 year-old hot rod will not provide the quiet ride of modern-day Detroit iron, though I expect it to be much quieter and cooler than the other old cars like this that and I have owned.

HushMat Ultra Sound Deadening & Thermal Insulation material is a butyl rubber constrained layer (foil backed) damping material that’s just below 1/8" thick & 0.47 pounds per square foot. It forms & contours easily to uneven surfaces with no surface preparation or cleaning required other than vacuuming any dirt and wiping with a damp rag. It reduces thermal transfer by over 400% and is rated to perform up to 400 degrees Fahrenheit.

Silencer Megabond Sound absorbing & thermal insulating foam is 100% EPDM foam rubber with an aggressive butyl-based pressure sensitive adhesive. It can be applied over HushMat Ultra or directly to the floor under carpet, door panels and headliner. It absorbs airborne and wind noise. It is designed to allow less than 0.5% water absorption and is rated to perform up to 300 degrees Fahrenheit.

Silencer Megabond foam is available in three thicknesses. The thickest, 1/2-inch, is for areas like the firewall and the others for places not needing as much sound-deadening effect.

Quiet Tape is a soft, pliable foam tape for universal application and works well at holding wires in place behind the dash or beneath carpeting where it routes to the rear of the vehicle.


Ultra H2O damping and seam sealing water-based paste is used as a sound-deadening material injected between panels like the decklid or doors where access to applying HushMat Ultra is not practical. A standard silicone application tool is used for the dispensing of Ultra H2O. You apply a bead of Ultra H-2-O between the trunklid frame and the outer skin – ensure that you have good contact on both surfaces with the H-2-O.

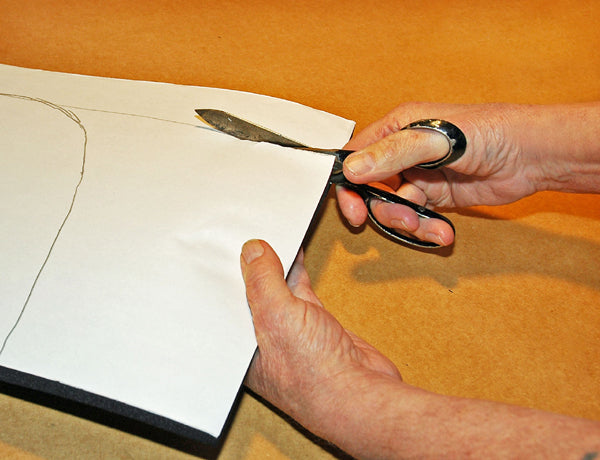
These basic tools should be all that is needed for the installation. Wood chisel (second from left) has a tapered end that made it possible to smooth the edges of the HushMat Ultra in areas where the roller or my fingers could not reach. You will also need a tape measure and marking pen or pencil to mark the cutting lines.

Cardboard can be used to make patterns. A permanent marker is good for tracing the outline of the pattern on the HushMat Ultra.

After you have applied a few sheets of the HushMat Ultra you will have some backing paper to use for patterns. The backing paper is flexible so that it can be formed around irregular shapes and stiff enough to hold a crease providing cutting lines.

A razor knife can be used to cut the material but I found that it was easier to do with scissors. Don’t remove the backing paper before cutting, as this will make it stick to everything, including the scissors when you begin cutting.

My firewall has a recess that measures exactly the width of one standard sheet (12-inches across including the angled sides) so I marked the center and peeled back the backing paper a bit and stuck it to the top of the recess. I then continued peeling back the paper and smoothing out the HushMat Ultra to the face of the firewall recess. Then folded it around the sides and trimmed away the excess length and overlap at the corners.

A pattern was made for the right side using a piece of backing paper cut to fit.

The HushMat Ultra sticks tenaciously to just about anything that it touches, including the backing paper, so I found it easier to remove the backing paper and reapply it loosely. Cutting it into smaller strips made it easier to expose a small area and smooth it in place before exposing another segment.

The pattern was flipped over to mark the sheet for the other side of the firewall. Gap in the center was filled with the excess left after trimming the first sheet used for the center projection. Small relief was cut to clear the throttle pedal linkage when the center covering was folded over.

Patterns were made from backing paper to fill the areas behind both kick panels. It was done in two pieces to span the support running through the area.

Underside of the cowl was covered using two sheets trimmed to follow the irregular contours. First patterns were made because the area is so irregular in shape and contour.

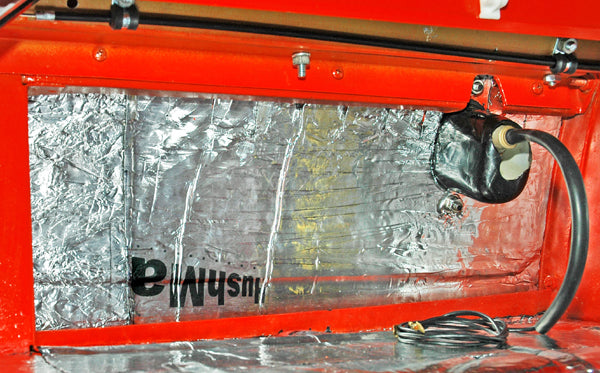
Here is the completed installation of HushMat Ultra to the cowl and firewall area.

Next I applied HushMat Ultra in full sheets to the front inside of the quarter panels on both the right and left side. Then cut a full sheet to follow the contours of the body above the wheelwells.

Use a full sheet wherever possible to maximize the process with the minimal amount of waste when trimming to fit.

Because of the irregular contours of this area making patterns is necessary. There is no square corner so I lined up the longest straight edge, then scored and cut the pattern to fit.

The pattern was transferred to the sheet and cut out with scissors. It looks like there is a lot of clearance behind that upright but the large sheet will stick to anything it contacts so removing the backing and reapplying it loosely will make it easier to apply with minimal wrinkles.

The rest of the wheelwell area had to be covered with pieces cut to fit after making patterns. I chose to cover the area completely but you could leave a little gap around the edges the way that OEM automakers do. There are a number of seams between the pieces but they are not a problem as the HushMat Ultra sticks tenaciously.
Flat areas like this and the rear floorboards are pretty easy to cover. I removed the taillights to place the HushMat Ultra sheet, and then cut away the material covering the opening before reinstalling them.

The body panel behind the seat has a hinge bracket that is almost touching the panel. Feeding the sheet under the hinge bracket and removing the backing paper was very difficult because it would stick and not slide beneath it.

The piece on the left shows how I removed the backing paper, cut it in strips and folded it creating a hinge to feed it behind a close obstruction without it sticking where I didn’t want it to. The piece on the right is how I cut the piece in half and moved the backing paper in so the edges could be placed, then the sheet smoothed toward the center just leaving a small seam where they met.

I left the flat floor area until last because it can be done with full sheets and minimal trimming. Small stiffening recesses in the floorboard can be pressed in using a finger because the sheet has flexibility to mold around contours. The deep V-shaped channel crossing the floor had to be filled by smoothing the sheet down on one side and up the other because the HushMat Ultra backing will stretch quite far but the foil will tear if you try to stretch it into something this deep.

If you are careful when placing a sheet there will not be a lot of wrinkles or air bubbles beneath them. If you leave any, the bubbles can be punctured with a knife tip and then rolled out with a roller like this one made for smoothing seams on wallpaper.

Here is the finished installation of the HushMat Ultra. Any holes that need to be opened can be pressed down with a fingertip and cut out with a razor knife.

Silencer Megabond foam (1/2-inch) was the next item to install. The sheets are the same size as the HushMat Ultra so I was able to cover the firewall repeating the same procedures. The only difference in the installation on the recess was in not having to cut the top corners because the flexibility of the foam allowed it to be formed around them.

The old pattern used to apply the HushMat Ultra worked well with just a small amount of trimming to allow for the extra thickness of the Silencer Megabond.

The foam is easier to mark by tracing the outline of the pattern onto the backing paper because the foam doesn’t mark very easily.
I had the best results cutting the foam with scissors. A razor knife will work but leave a more ragged edge.

Foam is applied the same way as the HushMat Ultra and sticks very well.

The combination of HushMat Ultra and Silencer Megabond should cut down the transmission of heat and engine noise through the firewall. Carpeting will be applied over the foam completing the installation.